Google has finally rolled out
Google+ which is not yet another service like Google Wave and Buzz, but is an amazing and power packed social networking website which is deemed to rise very high and compete with today’s biggies ‘Facebook and Twitter’.
I tried out Google+ after getting an invite and found it really interesting, may it be its simple and cool design or the variety of features it offers. One has to accept that Google has done some really good and hard work in bringing out Google+. After all, it was their long time wish to have a Google Social Network that can dominate over the web.
1. Click on Profile pictures to rotate through them.
2. Click ‘j‘ to navigate down to the next item or ‘k‘ to navigate up when checking the stream using keyboard.
3. To add formatting to your text, use the simple trick below.
- (*)bold(*): Add * before and after the message.
- (_)italics(_): Add _ before and after the message.
- (-)strike-through(-): Add - before and after the message.
For example: *Hello* _everyone_ -Mayur- will appear as shown below:
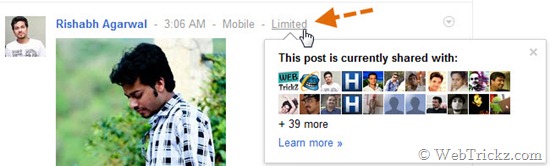
4. Click on “Limited” next to the timestamp to find out the actual list of persons with whom you are sharing a particular post.
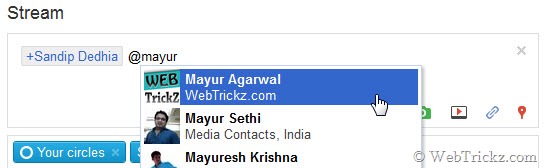
5. Add a + or @ signal to mention someone specifically in a post.
6. Click on the Timestamp to get the permalink (web URL) of any post.
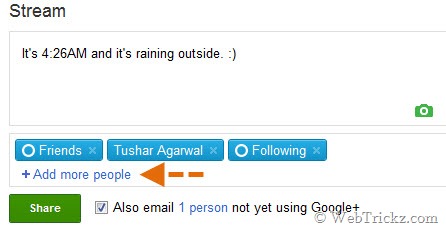
7. Share your post with Public or Circle/Circles only. You can even share a post with an individual by typing their name or email address. A very useful one!
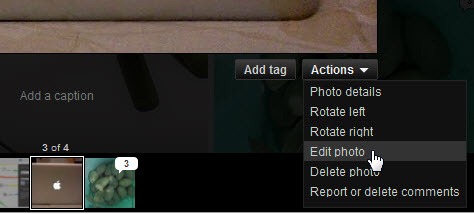
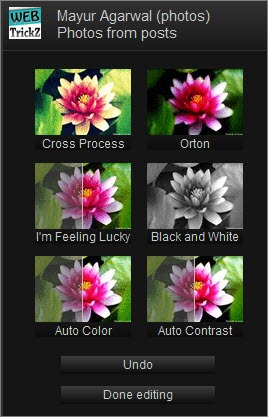
8. What’s more, you can even edit the photos uploaded by you. It’s easy and flawless.
Open any picture uploaded by you or visit the gallery. Select Actions > Edit photo.
Then improve your not so good photos by adding some smart effects to them in a click.
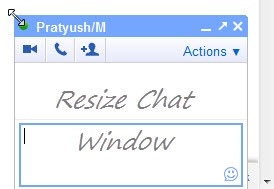
9. Unlike Gmail, you can Resize the Chat Box in Google+. To do so, just drag the box by its corner or sides.
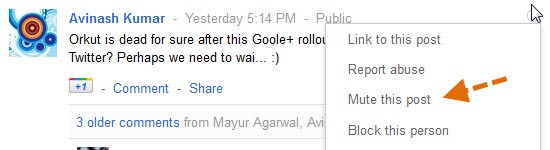
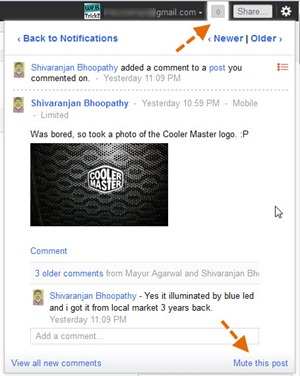
10. If you’re annoyed with some post that is getting lots of comments and thus irritating you with notifications. Just Mute the post. You can even Block any person and can Report Abuse against him.
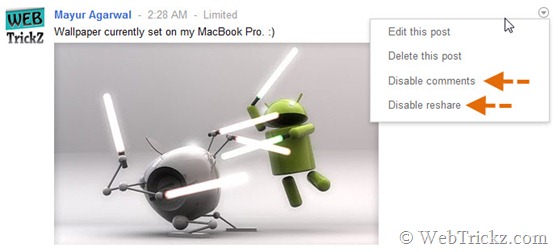
11. Set Options for any post made by you by clicking the grey drop-down ‘Options’ icon. You can choose to Edit it, Delete it, Disable comment or Disable Resharing a post.
12. Tired of receiving notifications for a particular post you made or commented on? Just hit “Mute this post” to get rid of it.
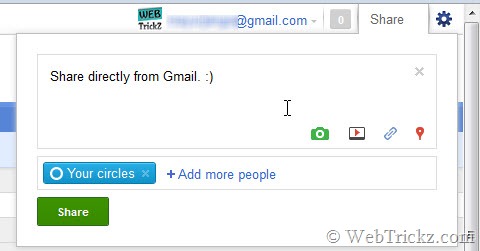
13. Share a post or check notifications on Google+ directly from within
Gmail account without opening a separate webpage for Google+. Now that’s seamless integration.

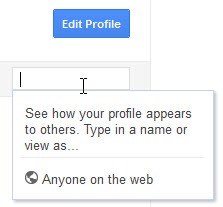
14. See how your profile appears to others – Input his/her username, select Edit profile, make the alterations to your profile only for that specific person. Something unique!
15. While on the Home tab, press twice the q key on the keyboard to search and add people to your chat list. (Press q 2nd time after a gap of sec).
16. Hitting Enter when focused on a Post opens up the comment box.
18. What’s that Incoming option under Stream? "Incoming" stream is stuff from people who are sharing with you, but who you haven’t added to a circle.
19. Give feedback – Found any bug or have a tip to suggest? Just click Send feedback from lower right corner, cool part is you can highlight the faulty area and report about it.
20. Trick to Invite anyone to Google+ even if you don’t have invites – Make a post, Share it with that person using his email address. Then ask him to click Learn more about Google+ in the received email. On opening it, he would be able to Join Google+.
21. To activate Email in Google+, just open your Google+ profile and click on Edit Profile. Then tap the ‘Send an email’ option present just below your profile badge. Tick mark the box and select all those whom you like to stay in touch with you via Google+ Email.
After clicking Save, you will notice that ‘Send an email’ option has been enabled.
One good thing is that your actual email address remains hidden from the sender. Also, if you email anyone then Google sends a copy of it at your Gmail email address too. 22. Use the Scroll wheel of your mouse to Navigate through the Photos in the gallery.
23. Enable Chat for Circles – To enable this feature, just hover your mouse cursor over Chat option in Google+ and click on the grey drop-down arrow. Select ‘Circles’ and then Choose the circles you want to chat with. You can select several Circles namely: Acquaintances, Family, Friends and Following. It’s better to add circles with people whom you know like family and friends.
Note: Chatting would be possible only when People (whom you have added for Chat) have also enabled the Chat feature. You will then be able to chat when they’re online and available for Chat.
Only enable chat for people who you trust because:
When you appear in someone’s chat list in Google+, it’s possible that person could discover your email address. While your email address won’t be displayed in the chat list in Google+, it is displayed in the chat lists of other Google products (Gmail and iGoogle, for instance).
24. Drag and Drop Photos, Videos and Links directly to post box from your desktop.
25. Manage how People from your Circles appears to everyone on your Profile – Open your Google+profile and edit it. Then click the round black-grey icon and select the desired options. You can also choose to hide the “Have you in Circles” box.
26. Make +1 Tab Public – The +1 tab on your Google+ profile is disabled by default to be seen by anyone else, i.e. only you can see that tab. To make it public, visit your profile > Edit profile. Click on+1’s tab and tick mark the option ‘Show this tab on my profile’. Now everyone would be able to see the +1s by you. (It only lists the +1s that you’ve done on any webpage outside of Google+).
Tip credit:http://webtrickz.com


 Windows 7 can create "virtual" wifi adapters based on the real adapters, with a unique MAC address and everything. This is similar to VAPs on Linux, which allows you to create one virtual adapter for logging onto an access-point, and another for running a soft-ap. The difference with Windows 7 is that it creates only a single virtual adapter for "hosted" mode -- no matter how many actual adapters you have in the system. It's called "Microsoft Virtual WiFi Miniport Adapter", with the same MAC address decremented by one.